Step-by-step instructions for creating a digital prototype
This is part of my workshop recipe series where I’ll be sharing methods from the Design Sprint. This recipe first appeared in Google’s Design Sprint Kit.
When you are running a Design Sprint, prototyping is the major focus of the second half of your week. It’s fast and furious, which means that having a solid plan and approach to creating your prototype is necessary. Whether you are creating a prototype for a sprint or another reason, this guide is here to help.
Follow the methods below to stay organized as you build a digital prototype quickly and effectively. What is unique about this approach is that it allows various makers to contribute to a digital prototype in parallel, which helps you build deeper and more involved prototypes.

How to Create a Rapid Prototype…
Read on for my collaborative approach to building a digital prototype.
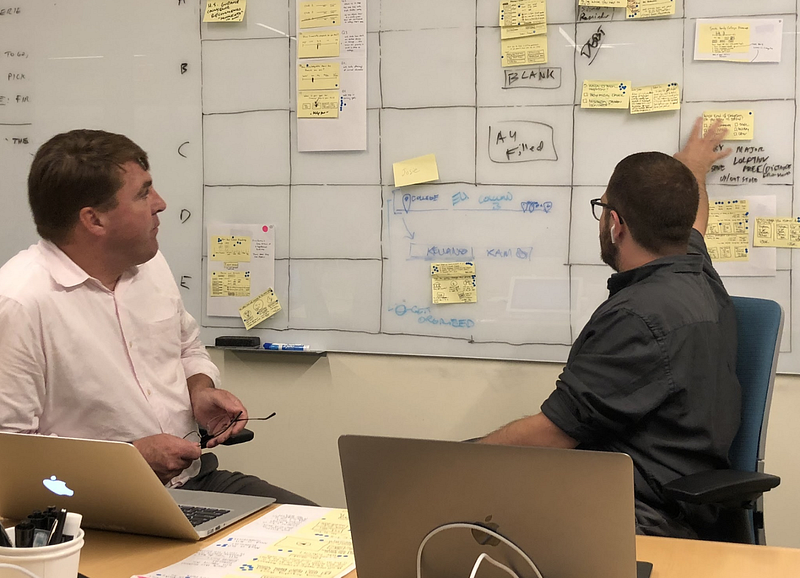
1. Create a storyboard
60–90 mins

Storyboarding is an essential aspect of prototyping. A good storyboard gives the team a shared understanding of exactly what to prototype. It spells out the essential moments in concrete detail to guide the team during prototyping. The design sprint facilitator is vital to helping the team consider how those moments fit into the flow of the experience that will be tested.
Method
- Draw a grid on a whiteboard using an 8.5 x 11 sheet of paper to create consistent cells.
- Have each team member write down 7 action steps that people will encounter during the test.
- Review and vote on the best flow that meets the goal and questions of the Design Sprint.
- Move the top voted flow into the storyboard grid to serve as the foundation of the prototype.
- Using sketches from team members, move the post-its that align with the voted action steps into the corresponding cells.
- Use dry erase markers to add additional detail to the storyboard where team members identify gaps or missing elements.
2. Create a Kanban board
30 mins
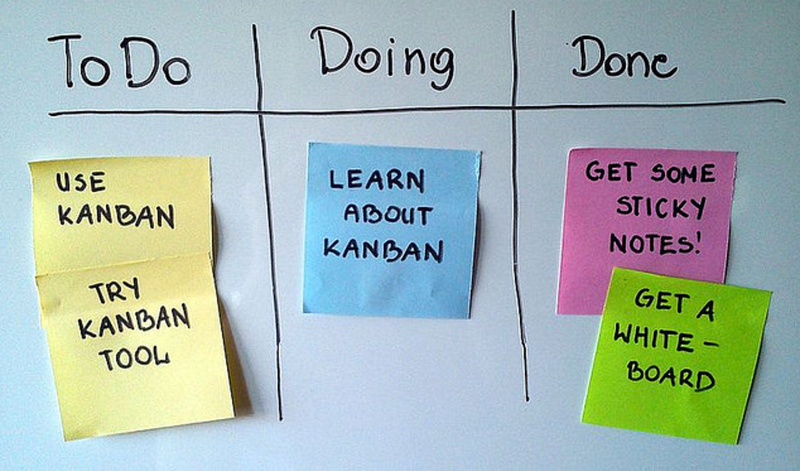
Use a Kanban board during prototyping so you have a visual overview of all tasks and who is responsible. Typically, this is a physical Kanban made on the whiteboard. The Stitcher (the Design Sprint “scrum master”) uses this tool to make sure everything is moving along and who to ask for an asset.
Benefits
- Keeps everyone up-to-speed on jobs that are in progress and what need to be done.
- Team members can self-select tasks that still need to be done.
- Participants can request support from team members that recently completed jobs.
Method Steps
- Create three columns: To Do, Doing, Done.
- Use Post-its to capture job task descriptions and place them in the To Do column.
- Sort the jobs by priority, which the highest priority jobs at the top.
- Assign each task to a team member, by writing their initials on the Post-it
- When a team member starts a task they will move the card to “in progress”
- Once the task is completed, the team member moves the Post-it to the done column.
- Have the stitcher monitor progress of the Kanban board and encourage team members to support one another
3. Narrate the Storyboard
20 mins
In a design sprint, the Facilitator begins the prototyping day by narrating the storyboard, while the team listens and follows along. Use Expo markers and Post-its to capture jobs needed. (Remember: this is not a playback. Do not redesign the storyboard or introduce new ideas.)
Benefits
- Recap progress quickly.
- Capture points of interest from the team.
- Build alignment on prototype expectations.
- Generate additional jobs that need to be completed for the prototype.
Method Steps
- Quickly recap progress to date by reading the storyboard from the perspective of an interview subject.
- Simultaneously, the team takes individual notes to remind themselves of tasks that need to be completed.
- After the recap, the facilitator or stitcher captures additional jobs to add to the Kanban board.
4. Enable Instant Collaboration with Mural
We’ve started using the digital whiteboard tool Mural to organize the team and asset creation while making a prototype. This provides a structured collaboration format for teams to store work in a shared repository. We also like that it allows the prototype makers to access copy and content to implement in the prototype.
Here’s a link to a Mural space we’ve made for organizing assets during prototyping.
Benefits
- Eliminate the need to ask, “Did you update that?” or “Can you share that with me when you finish?”
- Keep communication quick and asynchronous.
- Transparent communication and asset storage are readily available after the sprint.
Method Steps
- Translate the jobs to Mural or Google Docs as a Kanban board.
- Create sections for each screen of the prototype.
- Team members place assets into the appropriate section.
- The stitcher gathers and organizes all assets to make sure the board is accurate and ready for the makers to pull from.
- Prototype makers copy and paste assets into the prototype.
- Comment and annotate to communicate on edits or any additional content needed.
5. Prototyping with Version Control
30 mins
This step-by-step tutorial covers a process for creating a prototype using Abstract, Sketch, Craft, and Invision. It’s a structured approach to keep the prototypes flexible, organized, and easy for the team to maintain.
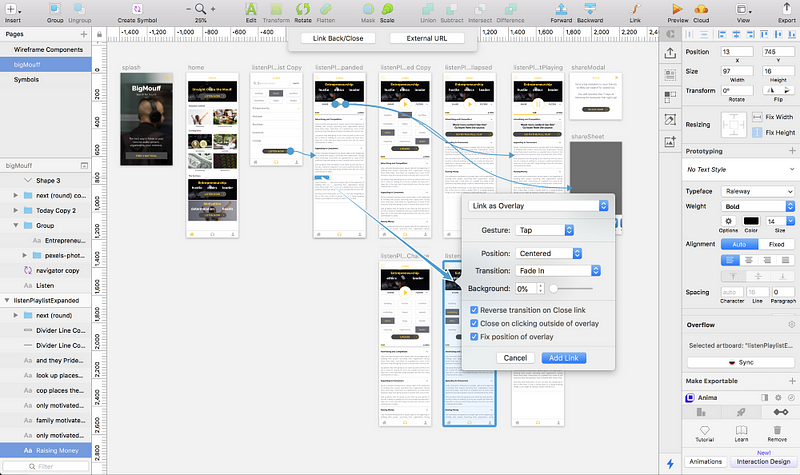
Benefits
- Prototyping with multiple makers and contributors.
- Version control and history prevents lost or repeated work.
- Rapid file sharing using new tools and streamlined workflow
- Cloud-based collaboration connects to existing tools in an experienced designer’s workflow.
Method Steps
- Download and Install Abstract, Sketch, Craft, and Invision.
- Create a New project in Abstract.
- Use Abstract to create a Sketch file which will automatically track all edits and revisions when the project is synced to the cloud.
- Draw or insert screens for the prototype in Sketch and save the edits.
- Draw hotspots in Sketch, and use the linking features in Craft to connect interactions and animations.
- Preview & Commit the edits to Abstract.
- Summarize the changes using brief but descriptive statements for other makers to reference.
- Sync the Sketch file to Invision using the Craft plugin.
- Create new branches in Abstract for each designer or maker working on the prototype.
- Delegate work based on the storyboard and Kanban jobs that focus on separate screens of the prototype.
- In the case of conflicting changes, use Abstract to resolve conflicts to preserve the most recent corrections.
- Check that your Abstract file is up to date with the most recent Commits to the project.
- Repeat Sketch edits, update the hotspots using Craft, sync to InVision, Preview and Commit to Abstract.
6. Prototype playback
15 mins
In this step, the interview moderator clicks through the prototype and reviews each screen. He or she talks about the related tasks and identifies revisions needed. The Stitcher captures the revisions and is responsible for delegating tasks to complete prototype updates.

Benefits
- Keep the user’s path top of mind to eliminate unnecessary work.
- Identify gaps or missing elements that are necessary to create a high fidelity experience.
- Orient the team around successes throughout the day to keep the energy high.
- Share the results with stakeholders to keep them informed about progress throughout the day.
Method Steps
- Spend no longer than 1–3 minutes narrating the prototype from the perspective of the user.
- Share the key tasks and questions that the interview subject will be asked.
- Add any errors or changes as jobs on the Kanban board.
- Talk about the wrap-up and debrief questions.
Resourceses
We’ve created interactive and free resources to help you build prototypes and accelerate your innovation process with your team. Check them out:
- Start Within Templates for MURAL – Based off of the book Start Within, we have constructed a framework of templates to help you assess your individual situation, how it relates to the unique nature of your company, and what tools and actions are appropriate for you to move forward.
- Beyond the Prototype templates for MURAL and Miro – break blockages that keep you from innovation by going beyond the prototype.


